Ready to Bustle?
Disclaimer: I am not a historic costumer and I’ve never worn a bustle. The purpose of this exercise was to gain experience in bustle making so I could better answer customer questions. If anyone reading this post is an actual historic costume maker, I heartily welcome your comments.
I searched online for directions on how to make a bustle and I didn’t find much, especially, I didn’t find anything with exact step by step directions.
In thinking about how I’d go about making a bustle, I considered what features it should have. The features I thought of are:
- Sitting down looked to me like an obvious problem with wearing a contraption such as this along with considering storage space, I decided the bustle should be collapsible.
- The weight of the skirts and the ability of the bustle to retain its shape was also a factor. I arbitrarily decided six ribs in 90° should be enough to hold the weight of the skirt and keep the desired shape. Again, this is a guess.
This is my first foray into making a bustle and I profess no expertise.
What I Used:
Hoop Wire – Add up the lengths of the ribs in Step D.
Cutters
Hole Punch – I used a 5/32” punch for the 6-32 threaded rod to fit through.
Grosgrain Ribbon – 7/8”. My example needed 24” folded in half to sew the casing for the ribs plus enough to make the waistband.
1 – Threaded Rod sized 6-32 (ACE Hardware) cut to measurement A below.
2 – Acorn Nuts sized 6-32 Brass (ACE Hardware)
¼” Milky White Tubing (ACE Hardware) cut to measurement I below. I used rubbing alcohol to remove the printing on the tubing.
Optional:
Bone Casing
½” Bone Tips
Bone Tip Pliers
Here’s What I Did:
-
 Measure the width of the hip where you want the bottom of the bustle to be – my example is 12”
-
 Measure the height from the bottom of the bustle to the waist (top of the bustle) – my example is 8”
-
 Arc hoop wire the width of A (12”) wide and the height of B (8”) to get the length – my example is 21”. Add 1“for seam allowance (1/2" on each side).
-
 Ribs: Cut six pieces of hoop wire, each shorter than the previous piece. For my example my rib lengths are:
- 22”
- 21 1/2”
- 20 1/2”
- 20”
- 19”
- 18 1/2”
-
Optional: Insert each rib into boning casing and secure ends with ½” bone tips.
-
 Mark a dot ½” from both ends of each rib and punch out a hole large enough for the 6-32 threaded rod to fit through. I used a 5/32” punch.
-
 Secure an acorn nut to right end of the threaded rod and thread the rod through the six ribs from the longest to the shortest.
- Cut the tubing the length of A minus (2* the stacked measurement of ribs) minus ¼” for the space the acorn nuts will take up. For my example: 12” – (2 * 11/16”) – ¼” = 10 1/16”. I rounded to 10”.
- Insert the threaded rod into the tubing.
- Thread the left end of the rod through the six pieces of hoop wire from the shortest to the longest.
- Secure an acorn nut to the left end of the threaded rod.
- Position the longest (top) rib perpendicular to the the shortest (bottom) rib forming a right angle. Space the remaining ribs to get the desired shape. Using a piece of grosgrain ribbon, mark both edges of each rib. The grosgrain ribbon should extend past the top rib about 2” so there is enough to secure the bustle to a waistband. Fold the grosgrain ribbon at the bottom and sew through both pieces to create the channels for each rib.
- Measure the waist and create a waistband with either ties, snap, or hook & bar at the center front. I doubled the grosgrain ribbon from center front around the back to center front.
- Secure the bustle channel to the center back of the waistband.
- Remove one acorn nut and the ribs from the threaded rod.
-
 Thread each rib through its channel of the bustle channel piece so that the bustle channel runs down the center of the bustle.
-
 Thread the rod through the six ribs from the shortest to the longest and secure an acorn nut to open end of the threaded rod.
-
Optional: Hand tack the grosgrain ribbon to the boning casing if used.
-
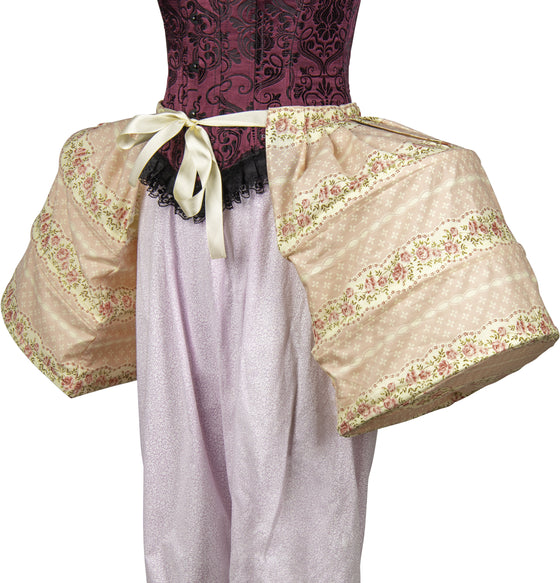
 The bustle collapses for easy storage.Put your costume on and, as my great-grandmother used to tell me, Hustle Your Bustle!

Leave a comment
Comments will be approved before showing up.

 Measure the width of the hip where you want the bottom of the bustle to be – my example is 12”
 Measure the height from the bottom of the bustle to the waist (top of the bustle) – my example is 8”
 Arc hoop wire the width of A (12”) wide and the height of B (8”) to get the length – my example is 21”. Add 1“for seam allowance (1/2" on each side).
 Ribs: Cut six pieces of hoop wire, each shorter than the previous piece. For my example my rib lengths are:
 Mark a dot ½” from both ends of each rib and punch out a hole large enough for the 6-32 threaded rod to fit through. I used a 5/32” punch.
 Secure an acorn nut to right end of the threaded rod and thread the rod through the six ribs from the longest to the shortest.
 Thread each rib through its channel of the bustle channel piece so that the bustle channel runs down the center of the bustle.
 Thread the rod through the six ribs from the shortest to the longest and secure an acorn nut to open end of the threaded rod.
 The bustle collapses for easy storage.Put your costume on and, as my great-grandmother used to tell me, Hustle Your Bustle!